


4 Seats (2 Reclining) + 5 Sides shown in Charcoal Grey Corded Velvet
Planning Your Recliner Layout
Before you start using your Reclining Seat(s), be sure to read all instructions.
Planning Your Layout
Planning Your Layout
Configuration Guidelines
- • Reclining Seat must be placed next to a Sactionals Seat, Side, or AnyTable on both right and left sides. A Sactionals Side must be used behind Reclining Seat. Do not clamp two Reclining Seats together.
- • Plan for at least 30 inches (77 cm) of clear space in front of your Reclining Seat to fully extend the footrest without obstruction.
- • Using Reclining Seat in a corner of a Sactionals configuration or on both sides of a Wedge Seat may obstruct adjacent Seats.
- • Reclining Seat should not be connected to a chaise or ottoman as Footrest functionality would be limited.
- • A StealthTech Sound + Charge Subwoofer cannot be installed inside of a Reclining Seat Frame. Reference StealthTech Sound + Charge Setup Guide prior to installing your Reclining Seat.
- • Not following these guidelines may increase risk of serious injury.
Plan Seat Depth
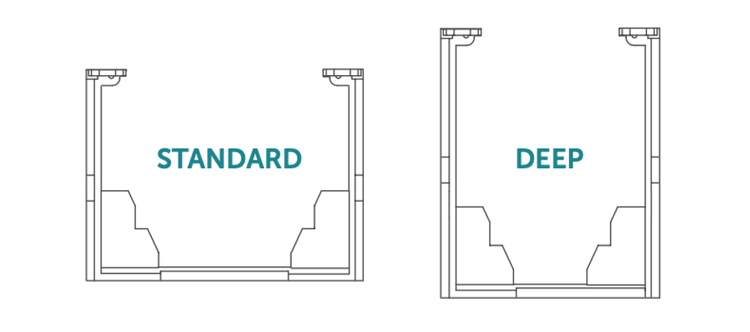
- • Reclining Seat can configure to either Standard or Deep Seat depths.
- • Your Reclining Seat Frame shipped preconfigured Standard or Deep based on Seat type purchased. To reconfigure to the other Seat depth, do that now by referring to the “Reconfigure” section.
Setup
Setup & Remote
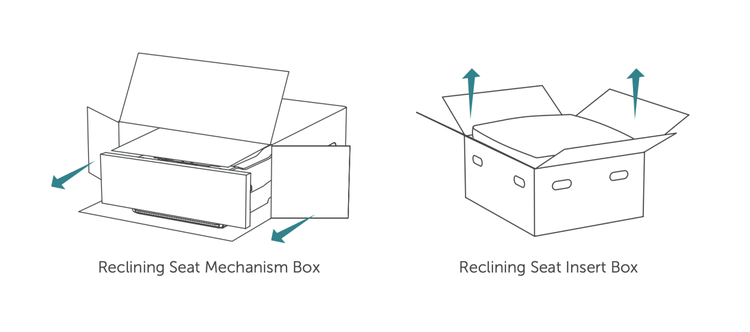
- STEP1 Unbox All Parts
- • Caution: Reclining Seat Mechanism weighs 80 lbs. Use minimum of two people to remove from packaging.
STEP 2 Cover All Inserts
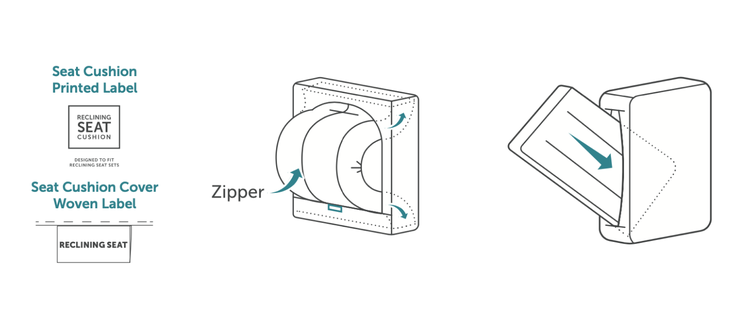
- • Cover Sactionals Reclining Seat Cushion Insert and Sactionals Back Pillow Insert. Your Reclining Seat Cushion Insert and Cover are labeled for easy indentification.
- • Note: Leave Reclining Seat Footrest uncovered at this stage. Reclining Seat Cushion and Covers are sized differently than other Sactionals Inserts.
STEP 3 Install Feet and Prep Layout
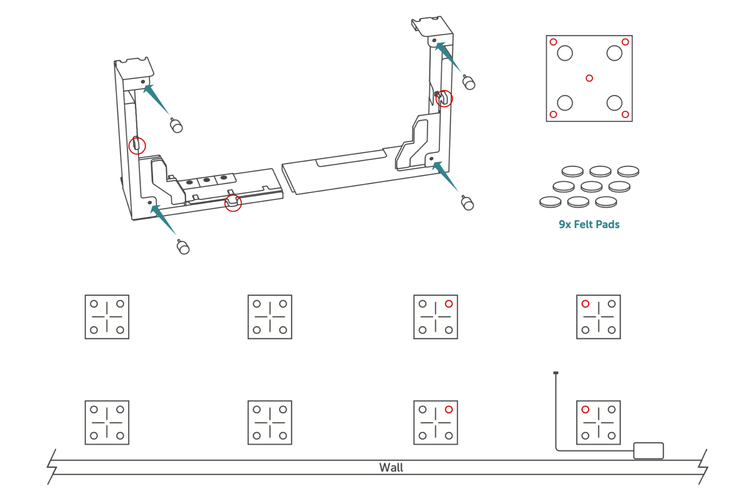
- • Install Feet and felt pads (*note: Feet do NOT need felt pads. Feet are lifted off floor by Shoes).
- • Lay Down Shoes and power cord.
- • Place Sactionals Seats and Sides.
STEP 4 Place Reclining Seat Frame
- • Place Reclining Seat Frame. Caution: Ensure cables are routed so they are not pinched by Shoes.
- • Secure Reclining Seat with clamp.

STEP 5 Install Reclining Seat Mechanism
- • Connect power cord.
- • Note: if you have Lovesac StealthTech products, ensure all cables and cords are placed through the groove underneath the Reclining Seat Mechanism so they do not get pinched.
- • Dock Reclining Seat Mechanism.
- • Caution: Reclining Seat Mechanism is HEAVY. Use handle and wheel to move.
- • Place Reclining Seat Frame Support Bars.

STEP 6 Install Seat Frame Lid
- • Slide Seat Frame Lid onto metal hooks on Reclining Seat Mechanism.
- • Press front of Seat Frame Lid down to lock in place.
- • *Note: Ensure Seat Frame Lid is oriented correctly to fit the Seat depth of your Reclining Seat. Front lock only needs to be used to REMOVE Seat Frame Lid, not to install. Seat Frame Lid should not come off the Reclining Seat Mechanism at this stage unless lock is twisted.

STEP 7 & 8 Install Reclining Seat Backrest
- • With the Backrest facing forwrds, slide Backrest into holes on back of Seat Frame Lid.
- • Place seat cushions & back pillows.

STEP 9 & 10 Install Footrest Extensions and Cover Footrest
- • Using Remote, extend Footrest and then slide Footrest Extensions into slots located on back of Footrest.
- • Cover Footrest. Store extra Footrest Cover for future use (Reclining Seat comes with two Footrest Covers to support Standard and Deep configurations).

CONTROLS Reclining Seat Remote
- • The Sactionals Reclining Seat is controlled by two buttons located on the Remote. Push and hold the buttons to recline to your desired position
- • The LED light bar will appear red while in use when your Remote needs to be charged. Use the USB-C port located on the side of the Remote to charge. Charge your Remote when you first receive your Reclining Seat, then every few months. Light bar will flash teal when charging and remain lit when fully charged until unplugged. Charging cord not included.
- • Your Remote should already be paired with your Reclining Seat. When pairing a new remote or to re-pair, unplug Reclining Seat Power Cord. After 10-30 seconds, hold both Remote buttons for 5 seconds. When pairing, LED light flashes Teal. Plug Reclining Seat Power Cord into power outlet. Confirm successful pairing by extending the Footrest.
- • The LED light bar will turn teal when Reclining Seat is in use.
- • Your Reclining Seat is equipped with added safety features including a sensor within the Mechanism to avoid entrapment. If Footrest stops while closing and the remote is beeping, release the button. Remove any obstructions before continued use of Reclining Seat.
Reconfigure
Reconfigure
STEP 1 Reconfigure Footrest
STEP 2 Remove Cushions, Backrest, & Seat Frame Lid
- • Unplug Reclining Seat form power source for safe disassembly.
- • Remove Back Pillow, Reclining Seat Cushion, and Backrest.
- • Turn lock at front of Seat Frame Lid and pull up to remove.
- • Remove Reclining Seat Frame Support Bars.
- • If configuring from Deep to Standard, remove Footrest Extensions from storage location and set aside.

STEP 3 Remove Reclining Seat Mechanism
STEP 4 Disassemble Reclining Seat Frame
- • Remove Reclining Seat Clamp.
- • Remove Seat Frame 4 (SF4).
- • Remove Seat Frame 3 (SF3).
- • Remove Seat Frame 1 (SF1).
- • Remove Seat Frame 2 (SF2).

STEP 5 Configure Reclining Seat Frame
- • Assemble SF1 and SF2.
- • Assemble SF3 and SF4.

STEP 6 Install Seat Frame
- • Place assembled Seat Frame 1 and 2 (SF1+SF2).
- • Place assembled Seat Frame 3 and 4 (SF3+SF4).

STEP 7 Complete Reclining Seat Setup
- • With Reclining Seat Frame now placed in new orientation, complete setup by following instructions in "Setup & Controls" section above (starting from "STEP 4").
Troubleshooting
Troubleshooting
What if my Reclining Seat is not reclining?
Ensure Power Cord is plugged in securely at both ends to a power source and the Reclining Seat Mechanism. If plugged in correctly and there is still no motion when pressing the buttons on your remote, ensure your remote is charged.
What if I lose power while reclined?
If this happens, do not attempt to force the Footrest down. Do your best to exit the Reclining Seat safely and wait until power is restored to the Reclining Seat to retract the Footrest.
Why is my Clamp too tight or too loose?
The Reclining Seat Clamp comes with a Thumb Screw that is made specifically for connecting your Reclining Seat Frame to a Sactionals Side. If you used a non-Reclining Seat Clamp, it may wiggle and fall off. Clamps should not be used to connect Reclining Seat to adjacent Sactionals Seats or Reclining Seats. Only Shoes should be used. If your Clamp is too tight, refer to the videos on our how-to guide for tips on removal.
What if I drop something (like the Remote or a phone) inside the Reclining Seat Mechanism?
If this happens, make sure to remove the Power Cord from the wall before retrieving the item. Do not operate your Reclining Seat until it has been removed.
What if my Reclining Seat starts squeaking, rattling, or not functioning properly?
Check to make sure you have assembled the Reclining Seat correctly and that all attachments, latches, and locks are secured properly. Check power cord to ensure there is no exposed wiring. Check to make sure Reclining Seat Mechanism and Seat Frame are level and properly placed in Shoes and clamped together.
What if my Seat Cushion Cover doesn’t fit?
Ensure you are using the Reclining Seat Cover by locating the “RECLINING SEAT” woven label on the bottom of the Cover.
What if my Seat Frame Lid doesn’t fit?
If your Seat Frame Lid is not locking into place, ensure Lid is properly positioned on the Reclining Seat Mechanism hooks, and that there is nothing obstructing the lock on the front side of the Lid.
Why doesn’t my Reclining Seat Mechanism Fit into the Reclining Seat Frame?
This may happen if your Reclining Seat Frame is not properly installed. To ensure your Frame is assembled properly, check that all pieces are properly connected and latches are secured.
Why did my Footrest stop retracting and extend back out?
Your Reclining Seat is equipped with added safety features including a sensor within the Mechanism to avoid entrapment. If anything is obstructing the Footrest while retracting, motion will reverse and the Remote will beep while flashing red. Remove all obstructions then resume normal operation.
Before you start using your Reclining Seat(s), be sure to read all instructions.